Showing posts with label Android Studio. Show all posts

Friday, March 25, 2016

Network calls using Retrofit 2.0

Hey look!
And with that, I'll make a new entry showing how to use Retrofit 2.0!

Note 1: this tutorial will use GSON as our deserializer. I've already written a GSON tutorial, so if you need help understanding GSON, check out what I did here.

Note 2: I have already written a tutorial on retrofit 1 in case you need to work with that instead. I refer the tutorial for Retrofit 1 a few times.

Create a new project

I'll assume that by now you know how to create a project. Alternatively you can apply this to an existing project, but for clarity I'll do this tutorial on a new blank project.

Add dependencies

Go to the build.gradle, and add the following dependencies:
compile 'com.squareup.retrofit2:retrofit:2.0.0'
compile 'com.squareup.retrofit2:converter-gson:2.0.0'
compile 'com.google.code.gson:gson:2.6.2'
We will be using the release version of retrofit 2.0, along with gson and the gson converter for retrofit 2.0.

So with those dependencies in place, this is what my entire gradle.build file looks like:
apply plugin: 'com.android.application'

android {
    compileSdkVersion 23
    buildToolsVersion "23.0.2"

    defaultConfig {
        applicationId "eduardoflores.com.test_retrofit2"
        minSdkVersion 16
        targetSdkVersion 23
        versionCode 1
        versionName "1.0"
    }
    buildTypes {
        release {
            minifyEnabled false
            proguardFiles getDefaultProguardFile('proguard-android.txt'), 'proguard-rules.pro'
        }
    }
}

dependencies {
    compile fileTree(dir: 'libs', include: ['*.jar'])
    testCompile 'junit:junit:4.12'
    compile 'com.android.support:appcompat-v7:23.1.1'

    compile 'com.squareup.retrofit2:retrofit:2.0.0'
    compile 'com.squareup.retrofit2:converter-gson:2.0.0'
    compile 'com.google.code.gson:gson:2.6.2'
}
Done with the gradle.build file.

Our JSON url

We will be parsing the JSON that comes from this url:
http://api.nestoria.co.uk/api?country=uk&pretty=1&encoding=json&listing_type=buy&action=search_listings&page=1&place_name=london

This will give a long and complex JSON. In case the site goes down in the future, here's a sample of what this looks like.

Create Object models for deserialization

In the JSON we can see the root objects of request and response, but both of these objects are inside a larger JSON object. I will call this wrapping JSON object the ServiceResponse (this key name does not show up in the JSON and I just made it up, but I will reference it in Java)

As convention, you may want to create a new folder/package in your Android studio project to hold only your model objects. In my case, I named this folder/package as 'model'

In Android studio, inside of model, create a new Java class and name it ServiceResponse.java.
In here, we're going to have only 2 objects: a Request object, and a Response object.

My ServiceResponse.java java file now looks like this:
package eduardoflores.com.test_retrofit2.model;

import com.google.gson.annotations.SerializedName;

/**
 * @author Eduardo Flores
 */
public class ServiceResponse {

    public Request request;

    public Response response;
}
And we're done with ServiceResponse.java.

Now let's create a Request.java file. This Request.java class is going to handle this portion of the code:
   "request" : {
      "country" : "uk",
      "language" : "en",
      "listing_type" : "buy",
      "location" : "london",
      "num_res" : "20",
      "offset" : 0,
      "output" : "json_xs",
      "page" : "1",
      "pretty" : "1",
      "product_type" : "realestate",
      "property_type" : "property",
      "size_type" : "gross",
      "size_unit" : "m2",
      "sort" : "nestoria_rank"
   }
Because of that, in our Request.java class we should create a property for country, language, listing_type, location, num_res...

My Request.java class now looks like this:

package eduardoflores.com.test_retrofit2.model;

import com.google.gson.annotations.SerializedName;

/**
 * @author Eduardo Flores
 */
public class Request
{
    public String country;

    public String language;

    @SerializedName("listing_type")
    public String listingType;

    public String location;

    @SerializedName("num_res")
    public String numRes;

    public Integer offset;

    @SerializedName("json_xs")
    public String jsonXs;

    public String page;

    public String pretty;

    @SerializedName("product_type")
    public String productType;

    @SerializedName("property_type")
    public String propertyType;

    @SerializedName("size_type")
    public String sizeType;

    @SerializedName("size_unit")
    public String sizeUnit;

    public String sort;
}
Again, if you're lost on the GSON conversion, make sure you review my GSON tutorial.
Also, I have no idea what some of these things are, like "json_xs", "num_res" or "pretty" and I probably will never use them.

Now let's create the Response.java file. This file will target this section of the code:
"response" : {
      "application_response_code" : "110",
      "application_response_text" : "listings returned, location very large",
      "attribution" : {
         "img_height" : 22,
         "img_url" : "http://s.uk.nestoria.nestimg.com/i/realestate/all/all/pbr.png",
         "img_width" : 183,
         "link_to_img" : "http://www.nestoria.com"
      },
      "created_http" : "Fri, 25 Mar 2016 16:47:00 GMT",
      "created_unix" : 1458924420,
      "link_to_url" : "http://www.nestoria.co.uk/london/property/buy/results-20",
      "listings" : [
         {
             // a listing object
         }
       ]
       }
   }
The import part here is to see that we will have an Attribution object, and a list of Listings objects. We will need to create these objects as well.

Here's now my Response.java class:
package eduardoflores.com.test_retrofit2.model;

import com.google.gson.annotations.SerializedName;

import java.util.List;

/**
 * @author Eduardo Flores
 */
public class Response
{
    @SerializedName("application_response_code")
    public String applicationResponseCode;

    @SerializedName("application_response_text")
    public String applicationResponseText;

    public Attribution attribution;

    public List<Listing> listings;
}
Now that you know the drill, here are also my Attribution.java and Listing.java objects.
Attribution.java class:
package eduardoflores.com.test_retrofit2.model;

import com.google.gson.annotations.SerializedName;

/**
 * @author Eduardo Flores
 */
public class Attribution
{
    @SerializedName("img_url")
    public String imageUrl;

    // additional properties...
}

And Listing.java class:
package eduardoflores.com.test_retrofit2.model;

import com.google.gson.annotations.SerializedName;

/**
 * @author Eduardo Flores
 */
public class Listing {

    @SerializedName("datasource_name")
    public String datasourceName;

    public String guid;

    public String title;

    // additional properties...
}
And now we're done with the model objects! that took a while...

Now let's go back to focus on Retrofit 2, which is really what we care about.

Retrofit workflow

Let's remember the Retrofit workflow from v1 we want to continue for v2:


We will break our url apart, and then start from right to left, with the Service Interface.

Break URL into parts

You should notice by now that we're making a GET call.
Our entire url is this:
http://api.nestoria.co.uk/api?country=uk&pretty=1&encoding=json&listing_type=buy&action=search_listings&page=1&place_name=london

Our base url is: http://api.nestoria.co.uk

Our interface url is:  api

Our url parameters are: country=uk&pretty=1&encoding=json&listing_type=buy&action=search_listings&page=1&place_name=london

In retrofit 2 the interface URL no longer needs to start with "/" but the code should work with it too. There are discussions on whether it is better to have the URL with and without the "/". For now I will keep it.

Create Retrofit Service Interface

Create a new interface file named Services.java and add the interface portion of the URL:
package eduardoflores.com.test_retrofit2;

import java.util.Map;

import eduardoflores.com.test_retrofit2.model.ServiceResponse;
import retrofit2.Call;
import retrofit2.http.GET;
import retrofit2.http.QueryMap;

/**
 * @author Eduardo Flores
 */
public interface Services
{
    @GET("/api")
    Call getListings(@QueryMap Map<String,String> parameters);
}
And now you should be asking "What is that Call return type??" and maybe if you were using Retrofit 1 you should be asking "Where's the Callback??"

In Retrofit 2, the return type of the interface method is Call, which allows for your network call to be either synchronous or asynchronous! The specific call type is now determined when we call the method, instead of in the method itself.
And about the missing Callback...well, you no longer need it.

The parameters that I'm passing will be the key-value pairs for the GET call.
If you need more information on what QueryMap is, I've added a more detailed explanation of Retrofit annotations on my Retrofit 1 tutorial.

So that's all you need in the interface class.

Create the Retrofit Service class

Now we need to setup the heart of Retrofit 2.
Create a new java class named Service.java.
We will only use one method in here, so this method will be static, but you could setup the reusable portions of this method into a constructor (like I did on my Retrofit 1 tutorial).

Here's my Service.java class. I'll explain what everything does below the code.
package eduardoflores.com.test_retrofit2;

import java.io.IOException;
import java.util.HashMap;
import java.util.Map;

import eduardoflores.com.test_retrofit2.model.ServiceResponse;
import okhttp3.Interceptor;
import okhttp3.OkHttpClient;
import retrofit2.Call;
import retrofit2.Callback;
import retrofit2.Response;
import retrofit2.Retrofit;
import retrofit2.converter.gson.GsonConverterFactory;

/**
 * @author Eduardo Flores
 */
public class Service {

    public static Call getListings(String listingType, String city)
    {
        OkHttpClient client = new OkHttpClient.Builder()
                .addInterceptor(new Interceptor() {
                    @Override
                    public okhttp3.Response intercept(Chain chain) throws IOException {
                        okhttp3.Response response = chain.proceed(chain.request());
                        System.out.println("request = " + chain.request().url().toString());
                        System.out.println("response = " + response);
                        return response;
                    }
                }).build();

        Retrofit retrofit = new Retrofit.Builder()
                .baseUrl("http://api.nestoria.co.uk")
                .addConverterFactory(GsonConverterFactory.create())
                .client(client)
                .build();

        Services services = retrofit.create(Services.class);

        Map parameters = new HashMap<>();
        parameters.put("country", "uk");
        parameters.put("pretty", "1");
        parameters.put("encoding", "json");
        parameters.put("listing_type", listingType);
        parameters.put("action", "search_listings");
        parameters.put("page", "1");
        parameters.put("place_name", city);

        return services.getListings(parameters);
    }
}

OkHttpClient: this is was the interceptor was on Retrofit 1. This can serve 2 purposes
1. Here's where you would be adding headers, if you need to add them to network call. These are added the same way as it was on Retrofit 1.
2. This can be used as a debugging tool. Right now I'm outputting the request and the response. This shows me if I'm getting a code 200 from the server, or something else, along with that's the entire call I'm making.
It is worth mentioning that the OkHttpClient is not required.

Retrofit: this used to be the RestAdapter. In here we add the baseUrl, the deserializer adapter, and the client (interceptor)

GsonConverterFactory: this is required in order to use GSON to parse our JSON data, and use the models we created earlier. There are options for XML as well, using Simple-XML.

We then create the Services object (from our Services.java interface) using the retrofit object we just created.

We create the parameters for the GET call as key-value pairs, and then make the call to the getListings() from the interface file.

All of this will return the Call type of object we are expecting from the interface.

Create the Consuming Activity

The time has come to finally consume (use) the data coming from the JSON, and from all of our hard work.
This part is actually pretty simple.

Here's the code for my standard default blank activity MainActivity.java:
package eduardoflores.com.test_retrofit2;

import android.support.v7.app.AppCompatActivity;
import android.os.Bundle;

import eduardoflores.com.test_retrofit2.model.Listing;
import eduardoflores.com.test_retrofit2.model.ServiceResponse;
import retrofit2.Call;
import retrofit2.Callback;
import retrofit2.Response;

public class MainActivity extends AppCompatActivity {

    @Override
    protected void onCreate(Bundle savedInstanceState) {
        super.onCreate(savedInstanceState);
        setContentView(R.layout.activity_main);

        Call<ServiceResponse> call = Service.getListings("buy", "london");
        call.enqueue(new Callback<ServiceResponse>() {
            @Override
            public void onResponse(Call<ServiceResponse> call, Response<ServiceResponse> response) {
                ServiceResponse serviceResponse = response.body();

                System.out.println("imageUrl = " + serviceResponse.response.attribution.imageUrl);

                for (Listing listing : serviceResponse.response.listings)
                {
                    System.out.println("listing title = " + listing.title);
                }
            }

            @Override
            public void onFailure(Call<ServiceResponse> call, Throwable t) {
                System.out.println("failure. Throwable = " + t);
            }
        });
    }
}
BUT WHAT DOES IT DOOOOO???!!
Call<ServiceResponse> call = Service.getListings("buy", "london");
This calls our static method getListings(), which returns a Call type, right? That's true, except we are getting a Call object with a deserialized object type ServiceResponse (our root wrapper for the JSON call, remember?)

Then we have 2 choices: synchronous vs asynchronous.
call.enqueue(...)
The enqueue version of the Call object provides us with an asynchronous network call in Retrofit 2. Inside the call.enqueue we can now add a Callback object, and handle the output in whatever way we want.

Alternatively, there's this:
call.execute()
This would execute your network call synchronously.

Additionally you can now also call things like:
call.cancel()
to stop a network call, like when a user returns to the previous activity after a network call has started, but not finished.

So there you have it!
Don't forget about the Internet permission in your manifest, and you should be all set to go with Retrofit 2.0.

Sunday, February 28, 2016

Why bother with Unit Testing, JUnit?

One of "my" students came asking me a very important question that I think it is very hard to explain at a classroom level.

His question was "what is this JUnit thing, and why should I even bother with it?"

See, this makes perfect sense for this student to question this concept to himself. In a classroom environment, specially on low level classes, all of your information, classes and data models are created in a very small scale, and they are all created by you. So if the app compiles and runs, you don't have an error. Because of this Unit Testing, or JUnit in Java, makes almost no sense.

Let's talk about this concept to hopefully clear out for you what Unit Testing is, and why you actually want it.

What is JUnit?

JUnit is a Unit Testing framework for Java. For the rest of this blog post I will stop calling this concept JUnit, and we'll talk about unit testing in general so it can be applied to other languages.

What is Unit Testing?

"Unit testing is a software development process in which the smallest testable parts of an application, called units, are individually and independently scrutinized for proper operation. Unit testing is often automated but it can also be done manually."

What does this mean, and why should I care about it?

This brings up back to the original question.
See, Unit Testing is often (read: 99.9% of the time) done automatically, so you should think of Unit Testing as a code you create to validate how you expect your code to work.
This makes more sense in a real-world type of example.

Let's say we are developing an app that downloads the data of all of the students at your school from some school server. This server gives us the first name, last name and age of each student.
For Java, we would create a student object like this:
public class Student {

    private String firstName;
    private String lastName;
    private int age;

    public String getFirstName() {
        return firstName;
    }

    public void setFirstName(String firstName) {
        this.firstName = firstName;
    }

    public String getLastName() {
        return lastName;
    }

    public void setLastName(String lastName) {
        this.lastName = lastName;
    }

    public int getAge() {
        return age;
    }

    public void setAge(int age) {
        this.age = age;
    }
}

And the server would return data like this:
{
    "students": [{
 "firstName": "Eduardo",
 "lastName": "Flores",
 "age": 20
 }, {
 "firstName": "Mary",
 "lastName": "Johnson",
 "age": 21
 }, {
 "firstName": "Mike",
 "lastName": "Pascal",
 "age": 22
 }, {
 "firstName": "John",
 "lastName": "Smith",
 "age": 25
 }
        // continue for 50000 students
        ]
}
This is a JSON string, but don't worry about that means right now. What matters is that you can see that every student has a firstName and lastName as String, and an age as a int.
We would assume your school also has something like 50,000 students...not just 4. You get the idea.

You create your app, it downloads and parses the data, everything works and you release your app. Life is good!

But then, one day, you hear your app crashed that morning. Then it crashed again when you tried it!

You debug your app, and you find out that the crash is cause by the app parsing the data that comes from the server. In other words, something the server is sending you is making the app crash.

Fixing this scenario without Unit Testing

Let's say you didn't do Unit Testing, and now you need to make sure the data coming from the server is valid. Well, unfortunately for you, the data is valid in general terms (there are no invalid characters) so since you don't have unit testing setup in your app, nothing created by a third party website or service can help you find the issue.

All you get is a crash report from the stack trace saying something about "not of type Integer (int)"

So...you'll have to loop through every single one of the students...all 50,000 of them...one...by...one...until you find the problem.

What's worse is that you created this app 6 months ago, and by now you have completely forgotten how the app works.

Fixing this scenario with Unit Testing

If you would've done unit testing on your application (and done it thoroughly), you can now run the unit test, and within 2 minutes you will know that a particular student has an age of 20.9 (no idea why, but I've seen it happen)

How would you know this?
Your unit test would fail when validating the age field of every student object downloaded, but it will tell you (again, if setup properly) that a student object coming from the server has an age of a double instead of an int.
This one student object is what is causing the crash in your app.

So now instead of having to go one-by-one on the data coming from the server, you can see that student "Jimmy Smith" of age 20.9 is causing the problem. And you did all of this within 2 minutes.

When you should write your Unit Test

Since your unit test is an individual test over a specific piece of data, you should write your unit tests when your app is running and it is stable. You should have all of your tests pass (unless you're intentionally creating failed tests) when your application and data is working properly.

Writing a unit test when the app is having a problem is very risky because it can give you false positives, but it can be done if you know exactly what you should expect out of your app.

What Unit Testing doesn't do for you


This seems to be the area where students struggle the most with Unit Testing, so here are the main 2 things Unit Testing does not do for you:

1. Unit testing can help you find a problem, and it can do it very fast and easy. However, it will not tell you how to fix the problem.
But think about it, in the example above, what would the solution be?
Should we modify our app?
Should we complain to the server to provide us with valid data?
Should the server remove that problem object?

In every situation the solution would be different, so Unit Testing can't tell you how to fix this.

2. Unit testing will not create any new end-user functionality to your app. Unit testing is basically a tool within an app created by developers for developers. This means that you can write unit testing cases for your app for a whole month, and your users won't see anything new (except possibly less issues). This gives new developers a feeling of writing code for nothing.

So there you have it. I hope a real-world example helps you.

Yes there could also be a better debugging environment, but the exaggerated scenario described here is very possible and it should highlight the benefits of Unit Testing.

Please let me know if you still have questions about Unit Testing, or provide any comments you may have about the concept of Unit Testing.

Tuesday, February 2, 2016

Deserialize JSON data returned from Retrofit, using GSON.

This tutorial takes off right where we ended the previous Retrofit tutorial.
At this point we have downloaded data and we have a single WeatherData object coming back from the service.

What we want now is to get the additional data from the JSON.
Before we continue, let's look at the sample JSON again.

Sample JSON

{
 "cnt": 3,
 "list": [{
  "coord": {
   "lon": 37.62,
   "lat": 55.75
  },
  "sys": {
   "message": 0.0045,
   "country": "RU",
   "sunrise": 1454390479,
   "sunset": 1454421906
  },
  "weather": [{
   "id": 803,
   "main": "Clouds",
   "description": "broken clouds",
   "icon": "04n"
  }],
  "main": {
   "temp": -1.4,
   "temp_min": -1.401,
   "temp_max": -1.401,
   "pressure": 1001.24,
   "sea_level": 1021.82,
   "grnd_level": 1001.24,
   "humidity": 93
  },
  "wind": {
   "speed": 3.55,
   "deg": 219.507
  },
  "clouds": {
   "all": 80
  },
  "dt": 1454380676,
  "id": 524901,
  "name": "Moscow"
 }, {
  "coord": {
   "lon": 30.52,
   "lat": 50.43
  },
  "sys": {
   "type": 1,
   "id": 7358,
   "message": 0.0282,
   "country": "UA",
   "sunrise": 1454391071,
   "sunset": 1454424722
  },
  "weather": [{
   "id": 800,
   "main": "Clear",
   "description": "Sky is Clear",
   "icon": "01n"
  }],
  "main": {
   "temp": -0.66,
   "pressure": 1016,
   "humidity": 100,
   "temp_min": -1,
   "temp_max": 0
  },
  "visibility": 10000,
  "wind": {
   "speed": 4,
   "deg": 220
  },
  "clouds": {
   "all": 0
  },
  "dt": 1454378400,
  "id": 703448,
  "name": "Kiev"
 }, {
  "coord": {
   "lon": -0.13,
   "lat": 51.51
  },
  "sys": {
   "message": 0.0141,
   "country": "GB",
   "sunrise": 1454398618,
   "sunset": 1454431885
  },
  "weather": [{
   "id": 804,
   "main": "Clouds",
   "description": "overcast clouds",
   "icon": "04n"
  }],
  "main": {
   "temp": 9.22,
   "temp_min": 9.224,
   "temp_max": 9.224,
   "pressure": 1017.04,
   "sea_level": 1027.01,
   "grnd_level": 1017.04,
   "humidity": 74
  },
  "wind": {
   "speed": 10.5,
   "deg": 255.507
  },
  "clouds": {
   "all": 92
  },
  "dt": 1454380483,
  "id": 2643743,
  "name": "London"
 }]
}
Remember, I'm getting the sample JSON from Open Weather Map


Understand JSON

Note: if you already understand what JSONs are, you may want to skip this section.
JSON strings are super easy. They are based on two concepts: JSON Objects and JSON Arrays, and key value pairs.

Key value pairs

These are 2 words that are separated with a colon (:), and each key value pair is separated with a comma (,). They are presented as this:

"key1":"value1", "key2":"value2","myKey":"my value","monster":"Cookie Monster", "myAge":32

Keys can have spaces, but they usually have issues on some programming languages, so that makes most keys to always be without spaces.
Values can be whatever you want. If they're Strings then they have quotes ("") around them, while integers and doubles don't have them. However, sometimes the output from the log from an IDE might place quotes around everything.

JSON Objects and JSON Arrays

By default a single JSON string contains a single JSON Object, but the most important part to remember about JSON Objects and JSON Arrays is this:

JSON Object are represented as {} (curly braces)
JSON Arrays are (usually) represented as [] (square brackets)

Note: XCode usually outputs JSON Arrays as () (parenthesis)

So with that, we can create a JSON Object like this:
{
 "key1": "value1",
 "monster": "Cookie Monster"
}
This is a JSON Object with 2 key values (we call that fields now)
Before we talk about JSON Arrays, you need to see what we can do now: we can do a key value pair with a key a JSON Object, like this:
{
 "key1": "value1",
 "monster": "Cookie Monster",
 "carObject": {
  "brand": "Ford",
  "model": "Model A"
 },
 "computerObject": {
  "brand": "Apple",
  "model": "Macbook pro"
 }
}
In here, we not have a key of carObject with a value of a new JSON Object. This new JSON Object has it's own set of key values. Same thing with computerObject.

JSON Arrays are basically what you would expect them to be: an array of JSON Objects. The only thing to remember is that JSON Arrays wrap JSON Objects, so they are represented before a curly brace.
Here's an example of a JSON Object with a JSON Array:
{
 "key1": "value1",
 "monster": "Cookie Monster",
 "carObject": [{
  "brand": "Ford",
  "model": "Model A"
 }, {
  "brand": "Chevy",
  "model": "Camaro"
 }]
}
So now inside the key of carObject we now have a JSON Array of JSON Objects. In this case we have 2 JSON Objects, each of them with their own key value pairs.

And with that under our belt, we go back to our Android application to parse our JSON.

Create Java objects

The point of our deserialization is to end up with POJOs (Plain Old Java Objects) out of this whole deal. In order to do that, we need to deserialize our JSON string with POJOs in the same order of our JSON. Let's look back at the JSON, in the simplest form (just 1 group instead of 3):
{
 "cnt": 3,
 "list": [{
  "coord": {
   "lon": 37.62,
   "lat": 55.75
  },
  "sys": {
   "message": 0.0045,
   "country": "RU",
   "sunrise": 1454390479,
   "sunset": 1454421906
  },
  "weather": [{
   "id": 803,
   "main": "Clouds",
   "description": "broken clouds",
   "icon": "04n"
  }],
  "main": {
   "temp": -1.4,
   "temp_min": -1.401,
   "temp_max": -1.401,
   "pressure": 1001.24,
   "sea_level": 1021.82,
   "grnd_level": 1001.24,
   "humidity": 93
  },
  "wind": {
   "speed": 3.55,
   "deg": 219.507
  },
  "clouds": {
   "all": 80
  },
  "dt": 1454380676,
  "id": 524901,
  "name": "Moscow"
 }]
}
In the Java side, we already have a class named WeatherData, and inside here we have this:
package eduardoflores.com.test_networkconnection;

import com.google.gson.annotations.SerializedName;

/**
 * @author Eduardo Flores
 */
public class WeatherData {

    @SerializedName("cnt")
    public int count;
}
We know this works, but now we need to move to the JSON key of list. When you look at the list key in the JSON you can kind of see that while the key itself says list, this is more like a location. So we will create a new Location.java class.
With the new Location class, we will update our WeatherData to get the list key as a Location object, and we will call this variable location.
package eduardoflores.com.test_networkconnection;

import com.google.gson.annotations.SerializedName;

import java.util.List;

/**
 * @author Eduardo Flores
 */
public class WeatherData {

    @SerializedName("cnt")
    public int count;

    @SerializedName("list")
    public List<Location> location;
}
Notice how the location variable is actually a List of Location object. Why? Because the JSON string returns a JSON Array for the key of list.

With that, we move to the Location object.
The Location object contains multiple other objects: coords, sys and weather.
We will create a new java class named Coordinates for the coords key, and a Weather class for the weather key. I decided to skip the sys object to demonstrate that not every key needs to be deserialized.

With the new Coordinates and Weather classes created, the Location object now looks like this:
package eduardoflores.com.test_networkconnection;

import com.google.gson.annotations.SerializedName;

import java.util.List;

/**
 * @author Eduardo Flores
 */
public class Location {

    @SerializedName("coord")
    public Coordinates coordinates;

    @SerializedName("weather")
    public List<Weather> weather;

}
This should be simple now for you, but we will continue into the Weather class to show one last thing.
In the Weather java class, add fields for id, main, description and icon:
package eduardoflores.com.test_networkconnection;

import com.google.gson.annotations.SerializedName;

/**
 * @author Eduardo Flores
 */
public class Weather {

    @SerializedName("id")
    public Integer weatherId;

    public String main;

    public String description;

    public String icon;

}
This should show one last thing: while you can use the @SerializedName annotation for all your fields, you don't really need to add it if you want to create a variable using the same name of the field. For example, the JSON Object returns the key of description, and that is fine with me so I created the variable as description as well, and since they're both the same I don't have to use the @SerializedName annotation.

Testing it!

So before we run the app, let's go back to the MainClass.java (created in the previous tutorial) and into the success method of the callback.
In here, we just want to verify things work, so let's create some log statements, like this:
public Callback<WeatherData> weatherCallback = new Callback<WeatherData>() {
    @Override
    public void success(WeatherData weatherQuery, Response response) {
        Log.i("MY_APP", "count = " + weatherQuery.count);
        Log.i("MY_APP", "latitude = " + weatherQuery.location.get(0).coordinates.latitude);
        Log.i("MY_APP", "weather description = " + weatherQuery.location.get(0).weather.get(0).description);
    }

    @Override
    public void failure(RetrofitError error) {
        Log.e("MY_APP", error.getLocalizedMessage());
    }
};
(Yes, create the coordinates object by yourself. It's easy!)

With that, the output should be something like this:
02-01 20:00:09.930 10210-10210/eduardoflores.com.test_networkconnection I/MY_APP: count = 3
02-01 20:00:09.930 10210-10210/eduardoflores.com.test_networkconnection I/MY_APP: latitude = 55.75
02-01 20:00:09.930 10210-10210/eduardoflores.com.test_networkconnection I/MY_APP: weather description = broken clouds

And there you have it! You should now be able to deserialize any JSON string that gets thrown at you using GSON and Retrofit.

Wednesday, December 2, 2015

Notificaciones en Android usando Parse.com

El proposito de este tutorial
El producto final va a ser una simple notificacion enviada desde la pagina web de Parse.com, y usaremos la plataforma de Parse para recibirla en Android. Cuando el usuario toque la notificacion en Android, la applicacion de Android se abrira automaticamente.
Todo esto se hara al configurar la plataforma de Parse.com y su SDK de Android.


Si prefieres ver este tutorial en video, subi un video mostrando esto pasa a paso en este link.


Que se necesita para este tutorial


Una cuenta en Parse.com. Una cuenta gratis sera suficiente para este ejercicio.
Un proyecto en Parse. Cualquier proyecto en Parse.com servira. (Si esto es muy complicado mandame un email y agrego los pasos para hacer el proyecto)
Android Studio
Un telefono Android, o el emulador

Comencemos!

Este tutorial esta hecho usando la guia de Parse.com para un proyecto ya existente de Android en vez de un proyecto nuevo. De esta forma este tutorial servira para ambos casos.

1. Obten la informacion de tu proyecto en Parse
Una vez que creas el proyecto en Parse, deberias ver algo similar a esto (Nov. 2015):


Primero que nada vamos a usar Gradle para instalar las librerias, por lo que no no va a ser necesario descargar el archivo .zip. No te preocupes de esto e ignora el primer paso mencionado en Parse.
Sin embargo, ya que vamos a usar Gradle para crear el proyector, es necesario agregar las dependencias que se muestran en el segundo paso. Haremos esto mas adelante.

La siguiente seccion es tambien muy importante ya que tiene nuestro ID y llave del proyecto de parse (Parse Application Id y Client Key).
Tu deberias tener tu propio par de ID y llave para usar especificamente con tu proyecto (Yo escondi los mios aca):

Por ahora deja abierta esta pagina web con la informacion de tu proyecto de Parse. Vamos a usar esta information en el proyecto de Android.

2. Crea un proyecto en Androi, o abre un proyecto existente
Si vas a crear un proyecto nuevo, cualquier proyecto va a servir para esta prueba. Es mejor si que tu proyecto soporte Android OS 4.1, o mas nuevo.

Para este tutorial yo cree un nuevo proyecto llamado "Test_ParsePush", y el nombre de el paquete de este proyecto es "com.eduardoflores.test_parsepush".
No importa cual es el nombre de tu paquete, pero si es necesario acordarse cual es ya que lo usaremos en el archivo de manifest.

3. Modifica tu archivo build.gradle (Module:app)
En este momento la estructura de tu proyecto en Android Studio deberia ser similar a esta:

Abre el archivo build.gradle que esta en tu modulo (si solo tienes 1 modulo, el modulo se llamara "app").
Al final de este archivo, en la seccion de "dependencies" vamos a agregar las dependencias de Parse que te dio Parse en su website al comienzo. Esto agregara el SDK de Parse a tu proyecto:
    compile 'com.parse.bolts:bolts-android:1.+'
    compile 'com.parse:parse-android:1.+'
Tus dependencias deberian ser ahora similares a estas (tu talvez tengas un poco mas o menos dependencias que venian con tu proyecto):
dependencies {
    compile fileTree(dir: 'libs', include: ['*.jar'])
    testCompile 'junit:junit:4.12'
    compile 'com.android.support:appcompat-v7:23.0.1'
    compile 'com.android.support:design:23.0.1'
    compile 'com.parse.bolts:bolts-android:1.+'
    compile 'com.parse:parse-android:1.+'
}

Ahora agrega el repositorio maven de donde vas a sacar las herramientas de Parse. (nota: esto es algo que no se menciona en los tutoriales de Parse):
buildscript {
    repositories {
        mavenCentral()
        maven { url 'https://maven.parse.com/repo' }
    }
    dependencies {
        classpath 'com.parse.tools:gradle:1.+'
    }
}
Y ahora finalmente agrega el plugin de Parse al comienzo de tu archivo build.gradle, asi:
apply plugin: 'com.parse'
Ahora tu archivo build.gradle completo deberia se deberia ver asi:
apply plugin: 'com.android.application'
apply plugin: 'com.parse'

buildscript {
    repositories {
        mavenCentral()
        maven { url 'https://maven.parse.com/repo' }
    }
    dependencies {
        classpath 'com.parse.tools:gradle:1.+'
    }
}

android {
    compileSdkVersion 23
    buildToolsVersion "23.0.1"

    defaultConfig {
        applicationId "eduardoflores.com.test_parsepush"
        minSdkVersion 16
        targetSdkVersion 23
        versionCode 1
        versionName "1.0"
    }
    buildTypes {
        release {
            minifyEnabled false
            proguardFiles getDefaultProguardFile('proguard-android.txt'), 'proguard-rules.pro'
        }
    }
}

dependencies {
    compile fileTree(dir: 'libs', include: ['*.jar'])
    testCompile 'junit:junit:4.12'
    compile 'com.android.support:appcompat-v7:23.0.1'
    compile 'com.android.support:design:23.0.1'
    compile 'com.parse.bolts:bolts-android:1.+'
    compile 'com.parse:parse-android:1.+'
}
 
Estamos listos con el archivo build.gradle y lo puedes cerrar.

4. Modifica tu archivo Manifest
Abre el archivo de manifest en tu aplicacion, en Android.
- En el archivo manifest, antes de <application, necesitas agregar 2 cosas.
La primera cosa es esta:
<uses-permission android:name="android.permission.INTERNET" />
<uses-permission android:name="android.permission.ACCESS_NETWORK_STATE" />
<uses-permission android:name="android.permission.WAKE_LOCK" />
<uses-permission android:name="android.permission.VIBRATE" />
<uses-permission android:name="android.permission.GET_ACCOUNTS" />
<uses-permission android:name="com.google.android.c2dm.permission.RECEIVE" />
La segunda cosa require cambiar el nombre del paquete a el nombre del paquete de tu aplicacion de Android:
<permission android:protectionLevel="signature"
                android:name="TU_PAQUETE.permission.C2D_MESSAGE" />
<uses-permission android:name="TU_PAQUETE.permission.C2D_MESSAGE" />
Aca, es importante de que cambies el texto de "TU_PAQUETE" con el nombre del paquete de tu aplicacion de Android. En mi caso, como lo mencione en el paso numero 2, el nombre del paquete de mi aplicacion es "com.eduardoflores.test_parsepush"

- Ahora en el mismo archivo de manifest, entre las ultimas etiquetas </activity> y </application>, necesitas poner la informacion de GCM para recibir tu mensaje:
<service android:name="com.parse.PushService" />
<receiver android:name="com.parse.ParsePushBroadcastReceiver"
          android:exported="false">
    <intent-filter>
        <action android:name="com.parse.push.intent.RECEIVE" />
        <action android:name="com.parse.push.intent.DELETE" />
        <action android:name="com.parse.push.intent.OPEN" />
    </intent-filter>
</receiver>
<receiver android:name="com.parse.GcmBroadcastReceiver"
          android:permission="com.google.android.c2dm.permission.SEND">
    <intent-filter>
        <action android:name="com.google.android.c2dm.intent.RECEIVE" />
        <action android:name="com.google.android.c2dm.intent.REGISTRATION" />
        <category android:name="TU_PAQUETE" />
    </intent-filter>
</receiver>
Date cuenta de que tambien debes poner el nombre del paquete de tu aplicacion en la ultima categoria de nombre.
Y asi, con el nombre del paquete de la aplicacion reemplazado, todo tu archivo manifest deberia ser similar a esto:
<?xml version="1.0" encoding="utf-8"?>
<manifest xmlns:android="http://schemas.android.com/apk/res/android"
    package="eduardoflores.com.test_parsepush" >

    <uses-permission android:name="android.permission.INTERNET" />
    <uses-permission android:name="android.permission.ACCESS_NETWORK_STATE" />
    <uses-permission android:name="android.permission.WAKE_LOCK" />
    <uses-permission android:name="android.permission.VIBRATE" />
    <uses-permission android:name="android.permission.GET_ACCOUNTS" />
    <uses-permission android:name="com.google.android.c2dm.permission.RECEIVE" />
    <permission android:protectionLevel="signature"
                android:name="eduardoflores.com.test_parsepush.permission.C2D_MESSAGE" />
    <uses-permission android:name="eduardoflores.com.test_parsepush.permission.C2D_MESSAGE" />

    <application
        android:name=".StarterClass"
        android:allowBackup="true"
        android:icon="@mipmap/ic_launcher"
        android:label="@string/app_name"
        android:supportsRtl="true"
        android:theme="@style/AppTheme" >
        <activity
            android:name=".MainActivity"
            android:label="@string/app_name"
            android:theme="@style/AppTheme.NoActionBar" >
            <intent-filter>
                <action android:name="android.intent.action.MAIN" />

                <category android:name="android.intent.category.LAUNCHER" />
            </intent-filter>
        </activity>

        <service android:name="com.parse.PushService" />
        <receiver android:name="com.parse.ParsePushBroadcastReceiver"
                  android:exported="false">
            <intent-filter>
                <action android:name="com.parse.push.intent.RECEIVE" />
                <action android:name="com.parse.push.intent.DELETE" />
                <action android:name="com.parse.push.intent.OPEN" />
            </intent-filter>
        </receiver>
        <receiver android:name="com.parse.GcmBroadcastReceiver"
                  android:permission="com.google.android.c2dm.permission.SEND">
            <intent-filter>
                <action android:name="com.google.android.c2dm.intent.RECEIVE" />
                <action android:name="com.google.android.c2dm.intent.REGISTRATION" />
                <category android:name="eduardoflores.com.test_parsepush" />
            </intent-filter>
        </receiver>
    </application>
</manifest>
Y ahora estas tambien listo con el archivo de manifest (lo de name=.StarterClass lo voy a explicar despues).

5. Escribe el codigo de Java en tu aplicacion Android
En tu actividad inicial debes inicializar el SDK de Parse con las llaves de Parse y el ID, y luego le dices a Parse que guarde eso en otro proceso.

Lo siguiente es muy importante: TU APLICACION NO VA A FUNCIONAR SI INICIALIZAS PARSE MAS DE UNA VEZ DENTRO DE TU APLICACION.

Que significa esto? Si tu inicializas Parse en el metodo de tu MainActivity, la aplicacion va a funcionar y vas a poder recibir notificaciones, pero solo si la aplicacion esta corriendo.
Una vez que la notificacion llegue tu aplicacion va a comenzar, el metodo onCreate() va a ser llamado nuevamente y Parse va a ser inicializado de nuevo. Esto hara que la aplicacion se termine con un mensaje de "Unable to create service com.parse.PushService: java.lang.NullPointerException" (no es posible crear un servicio de com.parse.PushService)
Para evitar esto vamos a crear una actividad simple que lo unico que va a ser es comenzar la aplicacion, junto con inicializar la libreria de Parse.


Crea una clase simple

Crea un nuevo archivo de java llamado "StarterClass.java" y haz que esta clase extienda Activity.

En la clase StarterClass, crea un metodo onCreate(), y adentro de este metodo, despues del super() metodo, agrega esto:
Parse.initialize(this, APPLICATION_ID, CLIENT_KEY);
ParseInstallation.getCurrentInstallation().saveInBackground();

Asi con eso, tu clase basica completa va a ser asi:
package eduardoflores.com.test_parsepush;

import com.parse.Parse;
import com.parse.ParseInstallation;

import android.app.Application;

/**
 * @author Eduardo Flores
 */
public class StarterClass extends Application {
    @Override
    public void onCreate() {
        super.onCreate();

        // Inicializa Parse
        Parse.initialize(this, "application_id_from_parse", "client_key_from_parse");
        ParseInstallation.getCurrentInstallation().saveInBackground();
    }
}
 
Esta clase StarterClass que creamos es lo que definimos en el archivo manifest bajo el nombre de name=".StarterClass" para la aplicacion. Asi esta clase es invocada solo una vez, haciendo que Parse tambien se inicialize una sola vez.

Y con eso, todo lo que necesitas ahora es mandar notificaciones desde Parse.com!
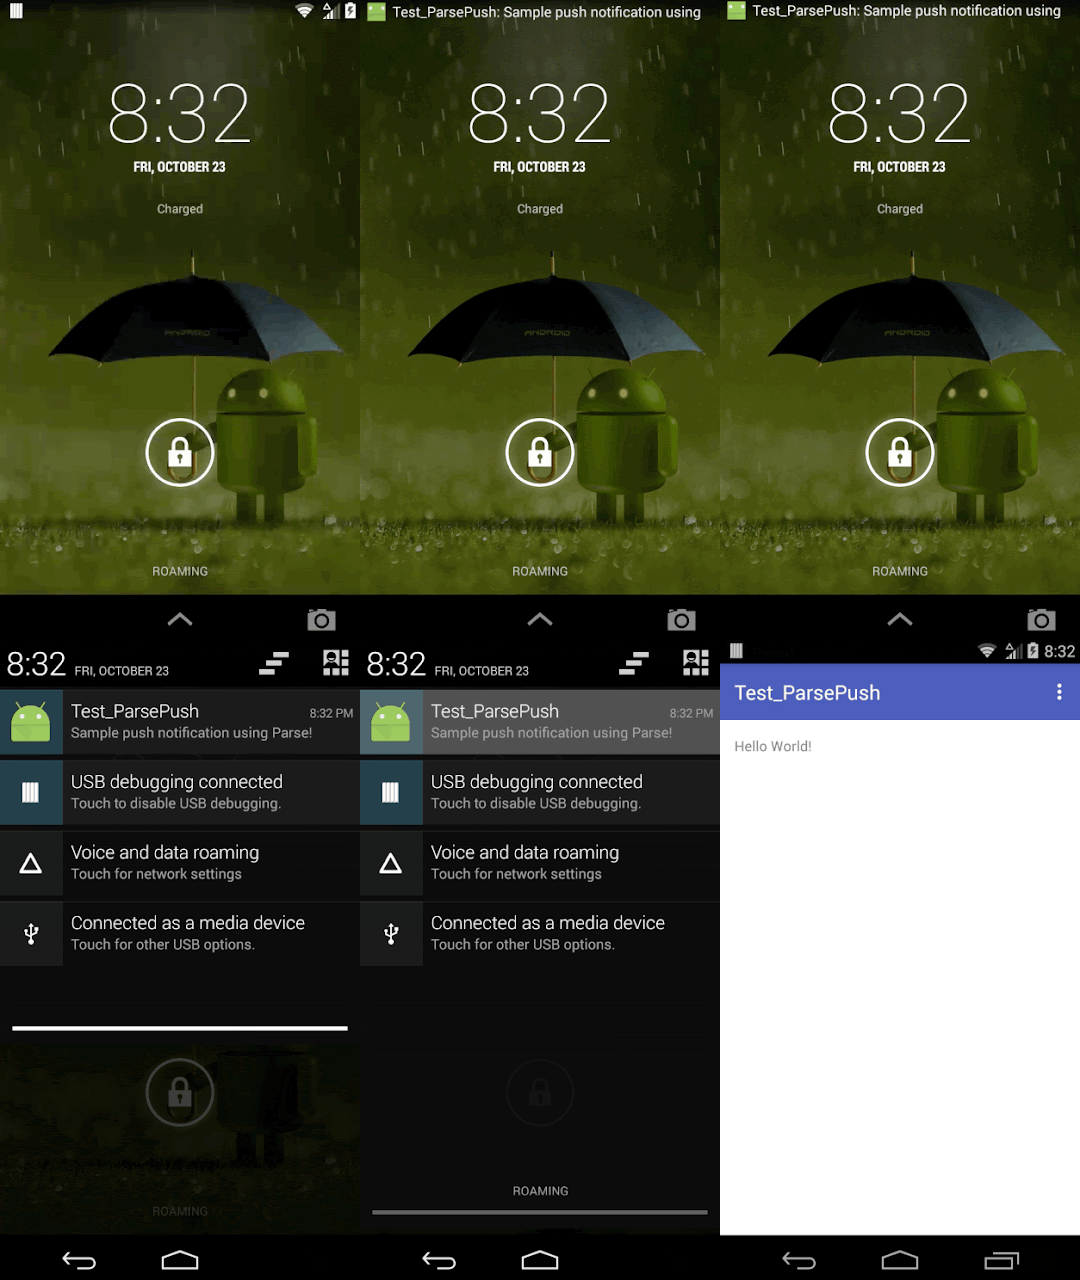
Corre tu aplicacion de Android y manda un mensaje desde Parse.com, y todo deberia funcionar como esto:


Y finalmente, puedes bajar todo el codigo de este tutorial desde aca.


Eduardo Flores.

Friday, October 23, 2015

Push notifications for Android using Parse.com

I'm writing this mainly because I spent a few hours last night trying to make this work, and the guides found at Parse.com were incomplete so things didn't work as smooth as they should've.

What this tutorial will accomplish

The final product will be a simple push notification sent from the web using Parse.com as the platform, which will make the phone get a notification of the message arrived. When the user touches the notification, the app will open.
We will do this by setting up the Parse push SDK in the application.


If you rather watch a step-by-step video of this tutorial, click on this link.

What you need for this tutorial


An account on Parse.com. A free account will work for this.
A Parse project. Any project in Parse.com will do (if this gets confusing, send me an email and I'll add these steps)
Android Studio
An android device or emulator

Get to work!

This tutorial will be done using the Parse.com guide of using an existing android project instead of a brand new project. This is because this way the tutorial will work both situations.

1. Get Parse project information
Once you create the project on Parse you should see something like this:


First of all, we'll be using Gradle to install the library so you don't need to download the .zip file. You can ignore this step.
However, since we'll be using Gradle to build our application we do care about the dependencies listed here. We will add this in the android project in a minute.

The portion below is also important since it has your Parse Application Id and Client Key.
You should get your own unique Application Id and Client Key for this Parse project, as shown here (I hid mine):

For now, just leave the web page of your Parse project open with this information. We will use it in the Android application.

2. Create an Android project, or open an existing project
If you're creating a new project, any blank project will do. I would suggest to support Android OS 4.1 and higher, but its up to you.

For this tutorial I created a new project named "Test_ParsePush", and the package name for this project is "com.eduardoflores.test_parsepush".
It doesn't matter what yours is, but we will need it in the manifest.

3. Modify your build.gradle (Module:app) file
Right now your project structure in Android Studio should look something like this:

Open the build.gradle file from your module (if you only have 1 module it'll be named "app").
At the bottom of this file, under "dependencies" we will be adding the dependencies given to you by Parse to get the Parse SDK:
    compile 'com.parse.bolts:bolts-android:1.+'
    compile 'com.parse:parse-android:1.+'
Your dependencies should look like this (you may have more or less default dependencies):
dependencies {
    compile fileTree(dir: 'libs', include: ['*.jar'])
    testCompile 'junit:junit:4.12'
    compile 'com.android.support:appcompat-v7:23.0.1'
    compile 'com.android.support:design:23.0.1'
    compile 'com.parse.bolts:bolts-android:1.+'
    compile 'com.parse:parse-android:1.+'
}

Now add the maven repository where you will be getting the Parse SDK tools. (note: this is not mentioned in the Parse tutorials):
buildscript {
    repositories {
        mavenCentral()
        maven { url 'https://maven.parse.com/repo' }
    }
    dependencies {
        classpath 'com.parse.tools:gradle:1.+'
    }
}
And finally add the parse plugin at the top of your build.gradle file, like this:
apply plugin: 'com.parse'
So now your entire build.gradle file should look something like this:
apply plugin: 'com.android.application'
apply plugin: 'com.parse'

buildscript {
    repositories {
        mavenCentral()
        maven { url 'https://maven.parse.com/repo' }
    }
    dependencies {
        classpath 'com.parse.tools:gradle:1.+'
    }
}

android {
    compileSdkVersion 23
    buildToolsVersion "23.0.1"

    defaultConfig {
        applicationId "eduardoflores.com.test_parsepush"
        minSdkVersion 16
        targetSdkVersion 23
        versionCode 1
        versionName "1.0"
    }
    buildTypes {
        release {
            minifyEnabled false
            proguardFiles getDefaultProguardFile('proguard-android.txt'), 'proguard-rules.pro'
        }
    }
}

dependencies {
    compile fileTree(dir: 'libs', include: ['*.jar'])
    testCompile 'junit:junit:4.12'
    compile 'com.android.support:appcompat-v7:23.0.1'
    compile 'com.android.support:design:23.0.1'
    compile 'com.parse.bolts:bolts-android:1.+'
    compile 'com.parse:parse-android:1.+'
}
 
You're done with the build.gradle file.

4. Modify your manifest file
Open the manifest file of your Android application.
- In your manifest file, before your <application tag, you need add 2 things.
The first one, goes just like this:
<uses-permission android:name="android.permission.INTERNET" />
<uses-permission android:name="android.permission.ACCESS_NETWORK_STATE" />
<uses-permission android:name="android.permission.WAKE_LOCK" />
<uses-permission android:name="android.permission.VIBRATE" />
<uses-permission android:name="android.permission.GET_ACCOUNTS" />
<uses-permission android:name="com.google.android.c2dm.permission.RECEIVE" />
The second thing requires you to change the package name to the package name of your Android application:
<permission android:protectionLevel="signature"
                android:name="YOUR_PACKAGE_NAME.permission.C2D_MESSAGE" />
<uses-permission android:name="YOUR_PACKAGE_NAME.permission.C2D_MESSAGE" />
In here, you need to make sure you're changing the text "YOUR_PACKAGE_NAME" with the name of your application's package name. In my case, as mentioned on step 2, the package name is "com.eduardoflores.test_parsepush"

- Now in the same manifest file, between the last </activity> and </application> tags, you need to enter this, for GCM to receive your message:
<service android:name="com.parse.PushService" />
<receiver android:name="com.parse.ParsePushBroadcastReceiver"
          android:exported="false">
    <intent-filter>
        <action android:name="com.parse.push.intent.RECEIVE" />
        <action android:name="com.parse.push.intent.DELETE" />
        <action android:name="com.parse.push.intent.OPEN" />
    </intent-filter>
</receiver>
<receiver android:name="com.parse.GcmBroadcastReceiver"
          android:permission="com.google.android.c2dm.permission.SEND">
    <intent-filter>
        <action android:name="com.google.android.c2dm.intent.RECEIVE" />
        <action android:name="com.google.android.c2dm.intent.REGISTRATION" />
        <category android:name="YOUR_PACKAGE_NAME" />
    </intent-filter>
</receiver>
Notice how you must also enter your application's package name in the last category's name.
So with that, and the package names replaced, your entire manifest file should look something like this:
<?xml version="1.0" encoding="utf-8"?>
<manifest xmlns:android="http://schemas.android.com/apk/res/android"
    package="eduardoflores.com.test_parsepush" >

    <uses-permission android:name="android.permission.INTERNET" />
    <uses-permission android:name="android.permission.ACCESS_NETWORK_STATE" />
    <uses-permission android:name="android.permission.WAKE_LOCK" />
    <uses-permission android:name="android.permission.VIBRATE" />
    <uses-permission android:name="android.permission.GET_ACCOUNTS" />
    <uses-permission android:name="com.google.android.c2dm.permission.RECEIVE" />
    <permission android:protectionLevel="signature"
                android:name="eduardoflores.com.test_parsepush.permission.C2D_MESSAGE" />
    <uses-permission android:name="eduardoflores.com.test_parsepush.permission.C2D_MESSAGE" />

    <application
        android:name=".StarterClass"
        android:allowBackup="true"
        android:icon="@mipmap/ic_launcher"
        android:label="@string/app_name"
        android:supportsRtl="true"
        android:theme="@style/AppTheme" >
        <activity
            android:name=".MainActivity"
            android:label="@string/app_name"
            android:theme="@style/AppTheme.NoActionBar" >
            <intent-filter>
                <action android:name="android.intent.action.MAIN" />

                <category android:name="android.intent.category.LAUNCHER" />
            </intent-filter>
        </activity>

        <service android:name="com.parse.PushService" />
        <receiver android:name="com.parse.ParsePushBroadcastReceiver"
                  android:exported="false">
            <intent-filter>
                <action android:name="com.parse.push.intent.RECEIVE" />
                <action android:name="com.parse.push.intent.DELETE" />
                <action android:name="com.parse.push.intent.OPEN" />
            </intent-filter>
        </receiver>
        <receiver android:name="com.parse.GcmBroadcastReceiver"
                  android:permission="com.google.android.c2dm.permission.SEND">
            <intent-filter>
                <action android:name="com.google.android.c2dm.intent.RECEIVE" />
                <action android:name="com.google.android.c2dm.intent.REGISTRATION" />
                <category android:name="eduardoflores.com.test_parsepush" />
            </intent-filter>
        </receiver>
    </application>
</manifest>
You're done with the manifest file (the name=.StarterClass will be explained later).

5. Write the Android application's java code
In your initial activity you must initialize the Parse SDK with the application id and the client key, and then you tell Parse to save that in a background thread.

This is very important: YOUR APP WILL CRASH IF YOU INITIALIZE PARSE MORE THAN ONCE IN YOUR APPLICATION.

What does this mean? If you initialize Parse on the onCreate() method of your MainActivity, the application will run and you will be able to receive notifications, but only if the app is running.
Once a notification arrives the app will start, the onCreate() method will get called again and Parse will be initialized again and the app will crash with a beautiful "Unable to create service com.parse.PushService: java.lang.NullPointerException"
To avoid this, we will create a simple starter activity that will just initialize the Parse library.


Create a starter class

Create a new java file called "StarterClass.java" and in this class extend Activity.

In the StarterClass class, add ann onCreate() method, and after the super() code, add this:
Parse.initialize(this, APPLICATION_ID, CLIENT_KEY);
ParseInstallation.getCurrentInstallation().saveInBackground();

So with that, your entire StarterClass class (StarterClass.java file) will look like this:
package eduardoflores.com.test_parsepush;

import com.parse.Parse;
import com.parse.ParseInstallation;

import android.app.Application;

/**
 * @author Eduardo Flores
 */
public class StarterClass extends Application {
    @Override
    public void onCreate() {
        super.onCreate();

        // Setup Parse
        Parse.initialize(this, "application_id_from_parse", "client_key_from_parse");
        ParseInstallation.getCurrentInstallation().saveInBackground();
    }
}
This StarterClass we just created is what we defined in the Manifest file under name=".StarterClass"for the application. This way this class only gets called once, and therefore, Parse only gets initialized once.

And that folks would be all you need to setup your app for notifications using Parse.
Now let's run the app and send a message to see how this puppy works!


And finally, you can download the source code of this project from this link.

Eduardo Flores.

Monday, March 23, 2015

Android Studio Rendering problems

A quick note:

On Android Studio version 1.1.0 for Mac (and maybe other versions) a brand new blank application throws an error dialog in the UI editor that says:

Rendering problems. The following classes could not be found:
- android.support.v7.internal.widget.ActionBarOverlayLayout

The issue seems to be in the version of the UI editor Android Studio is using.
On a blank default application Android studio is using level 22. Change the level in the UI editor to level 21 (or another other), and the error should go away:


Eduardo